I am confused at a specific point, notably where the MultiHead Class is created. There seems to be a discrepancy between the schematic figure: On the figure the q,k,v are first split and then run through the Dense layer. However, in the code itself, it seems they are first run through the dense layer, and only afterwards split up.
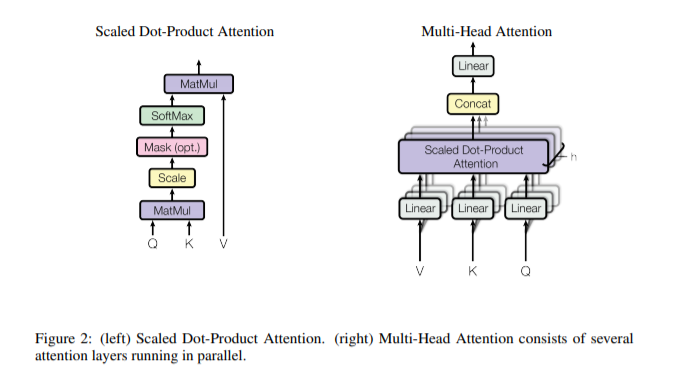
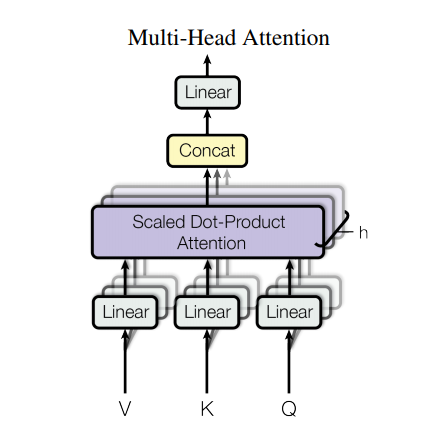
“Each multi-head attention block gets three inputs; Q (query), K (key), V (value). These are put through linear (Dense) layers and split up into multiple heads.”
class MultiHeadAttention(tf.keras.layers.Layer):
...
def call(self, v, k, q, mask):
...
  q = self.split_heads(q, batch_size)  # (batch_size, num_heads, seq_len_q, depth)
  k = self.split_heads(k, batch_size)  # (batch_size, num_heads, seq_len_k, depth)
  v = self.split_heads(v, batch_size)  # (batch_size, num_heads, seq_len_v, depth)
Is this correct?
The num_heads corresponds to h in the diagram, if I understand it correctly:
  def split_heads(self, x, batch_size):
    """Split the last dimension into (num_heads, depth).
    Transpose the result such that the shape is (batch_size, num_heads, seq_len, depth)
    """
    x = tf.reshape(x, (batch_size, -1, self.num_heads, self.depth))
    return tf.transpose(x, perm=[0, 2, 1, 3])
So, maybe the diagram does show the linear/dense -> split order rather than split -> linear/dense. Does it make sense? Let’s also loop in @markdaoust
If you work through it you’ll see that the two are equivalent. Splitting the output of a Dense into num_heads chunks, or creating num_headsDense layers is the same (except maybe for the initialization). Draw the weight matrices to see.
Thanks for your response! You are indeed correct on restating my questions perfectly! However, I still do not see how the diagram shows the inputs going through a linear/Dense and only then being split. In that case, I would expect only three linear/Dense layers on the figure, not nine.
I would expect only three linear/Dense layers on the figure, not nine.
What am I missing here?
Nothing. The code is correct, and simpler (+more efficient?) this way, with only one big linear layer. I didn’t have a good way to edit the figure. And I can’t switch it to EinsumDense yet.
If there’s something missing here it’sa sentence or two in the notebook explaining. Any chance you could send PR?


 I can see what you mean. Notice that the original diagram in the