Hi, I have been trying to run movenet with p5js. I have managed to get the detector working and can log out the poses. However , I am trying to draw a skeleton on top of the connected circle for vizualization purposes. I have looked into posenet as it has similar 17 keypoints. However, I noticed that some functions such as posenet.getAdjacentKeypoints are not implemented in movenet. I tried to look into the TFJS models -->src-->demo but could not get my head around how to implement the skeleton. My sample trial code is below.
let detector;
let poses;
let video;
async function init() {
  const detectorConfig = {
    modelType: poseDetection.movenet.modelType.SINGLEPOSE_LIGHTNING,
  };
  detector = await poseDetection.createDetector(
    poseDetection.SupportedModels.MoveNet,
    detectorConfig
  );
}

async function videoReady() {
  console.log("video ready");
  await getPoses();
}

async function setup() {
  createCanvas(640, 480);
  video = createCapture(VIDEO, videoReady);
  video.hide();

  await init();
  //createButton('pose').mousePressed(getPoses)
}

async function getPoses() {
  poses = await detector.estimatePoses(video.elt);
  setTimeout(getPoses, 0);
}

function draw() {
  background(220);
  image(video, 0, 0);
  if (poses && poses.length > 0) {
    //console.log(poses[0].keypoints.length)
    //console.log(poses[0].keypoints[0].x);
    for (let kp of poses[0].keypoints) {
      const { x, y, score } = kp;
      console.log(kp);
      if (score > 0.5) {
        fill(255);
        stroke(0);
        strokeWeight(4);
        circle(x, y, 16);
       }

    }

    for (let i = 0; i < poses[0].keypoints.length ; i ++)
      {
        // Get adjacent keypoints (Start with nose and left_eye)
        let x = poses[0].keypoints.length.nose

      }


  }


}
If i understand the line functions needs both the x1,x2 and y1,y2 co-ordinates to effectively join the points. I was wondering if anyone has managed to overlay the skeleton
But my understanding is that the results come back in the following form (there is no “.nose” on array length) instead if you want nose you would simply refer to: poses[0].keypoints[0].x and poses[0].keypoints[0].y as described below.
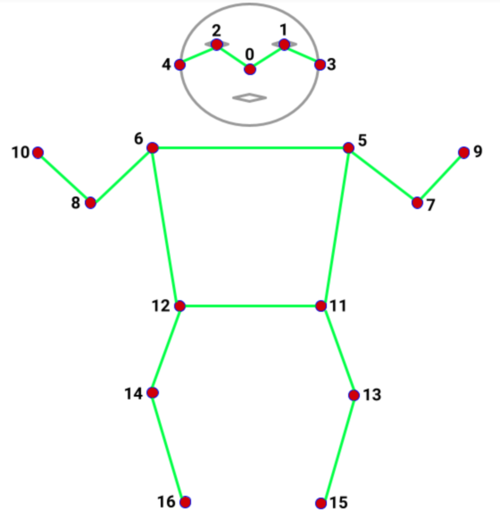
So using the names of the points (or the array offset as shown in the image below) you can plot them on the canvas as normal. If you draw out the points as dots first you can figure out which 2 points you want to connect eg left_shoulder to right_shoulder to get a line across the top of the body for example. It is up to you to decide what lines you want to draw though. You can use this diagram as reference:
Hence to draw a line from top left shoulder to top right shoulder, you would need to take the array elements 5 and 6 and draw a line between those 2 xy co-ordinates. You can add logic to check confidence score if that is important to you to ommit lines that do not have confidence > SOME_THRESHOLD for both points.
Hello @Jason , thank you . A rookie mistake by me . It helps me , better now to understand how the keypoints are accessed . Three additional questions
Is there a normalized way of getting the keypoints ? Or one has to normalize them in future ?
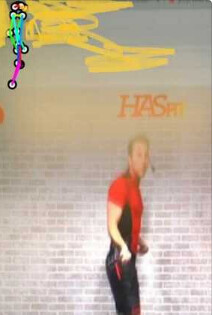
I tried to do a full screen mode (that is making the canvas size equal to the width and height of the video but i noticed that the overlaid skeleton is not upto the mark , It seems the skeletons are displayed in different scale. I have seen that you explained it in another thread but i could not quite understand it . It feels like the the skeleton did not get scaled . Is there a way to overcome this issue . Attaching the snippet and also the picture . (Drawinf function - image(video, 0, 0,windowWidth, windowHeight);
Any suggestions to overcome the jitters ? Increasing the confidence scores sometimes does not seem to workout that well.
    let detector;
    let poses;
    let video;

    async function init() {
      const detectorConfig = {
        modelType: poseDetection.movenet.modelType.SINGLEPOSE_LIGHTNING,enableSmoothing:1,
      };
      detector = await poseDetection.createDetector(
        poseDetection.SupportedModels.PoseNet,
        detectorConfig
      );
    }

    async function videoReady() {
      console.log("video ready");
      await getPoses();
    }

    async function setup() {
      createCanvas(windowWidth, windowHeight);

      video = createCapture(VIDEO, videoReady);
      console.log(video.height);
      video.hide();
      await init();
    }

    async function getPoses() {
      poses = await detector.estimatePoses(video.elt);
      //console.log(poses);
      setTimeout(getPoses, 0);
    }

    function draw() {
      background(220);
      image(video, 0, 0,windowWidth, windowHeight);
      if (poses && poses.length > 0) {
        for (let kp of poses[0].keypoints) {
          const { x, y, score } = kp;
          if (score > 0.5) {
            fill(255);
            stroke(0);
            strokeWeight(4);
            circle(x, y, 16);


          }
        }
      }
    }
The keypoints are simply the x,y co-ordinates found in the image you sent for classification. If you want to do any extra processing then that would be up to you.
It seems you have 2 different sized things - the image and the canvas. You can solve this by simply taking the x,y co-ordinates that are returned and divide the x by the original image width, and divide the y by the original image height. You then have a ratio you can use to find it’s new position of a larger version of the image (eg the canvas). Simply then multiply the new canvas.width with the ratio for the x to find the new relative x, and then do the same for height too.
From your static image I do not see any jitter and I can not replicate this on my side. It may be your camera/lighting causing lack of accuracy in prediction. If that does not solve then you could investigate some smoothing algorithm eg moving average or something to reduce jitter at cost of latency.
I am not entirely sure why but I found the results more jittery using p5.js vs direct, especially on the edges of the video, so I ended up dropping it for my project and going direct. Could be related to this point @Jason mentioned?
Also it seems P5 does some rendering magic of its own - it draws the video frame to canvas and then the dots on top of that, which is not terribly efficient as you are sampling video frame twice - you can just absolute position canvas on top of video element and draw the circles only on top of the already playing video saving you pushing twice the number of video pixel data around and only needing to worry about rendering dots to canvas based on the rendered size of the canvas.
@inuit . I dont think so , i think the recaling works but you are correct. It is not as smooth . in p5js . I am quiten new to JS and I thought it could be the easier way to experiment a bit.
What do you mean by “going direct” , are you doing something in react-native-expo ? I think last i checked it was not even loading the models and a lot of functionalities seem to be broken . That was my understanding . I am not sure though.